How to disable Windows 10 automatic update?
Microsoft’s Windows 10 has many features, and compared to previous versions of Windows, many features have been added, and some have been removed. One of these features is the ability to turn off the automatic update in Windows 10, which, like other Windows, cannot be disabled from the relevant section. When you turn off the update, it will be enabled again after a certain period. In this article, we will introduce you to 6 ways to turn off automatic updates in Windows 10. We also explain how to activate the automatic update of Windows 10. Stay with us in the now.
Why is it necessary to turn off updates in Windows 10?
Updates are provided to fix security problems, address problems, and improve the overall system. Still, sometimes we need to disable them, for example, when we want to control the entire system updates ourselves, govern the amount of internet usage, and the installation time of downloaded updates. We work with sensitive equipment and programs and…
Software, driver, and operating system updates may cause unexpected computer behavior. If you take a system backup before doing the update, you will have fewer problems. So you need to know the update time and turn off the automatic update.
On the other hand, many updates use a lot of bandwidth (network and system resources) to run and complete, slowing down the system and ultimately causing unexpected reboots.
Next, we will learn how to close Windows Update. Please note that by performing any of the following methods, you can still update Windows 10 manually and not automatically, which can be done through the Windows update page.
Six ways to disable Windows 10 automatic update
Turn off the automatic update in Windows 10; there are different ways. In this article, we discuss six ways to turn off the update in Windows 10:
- Use Settings
- Using the Windows Update service
- Using Group PolicyRegistry registry
- Use of the software
- Use wifi settings
In the following, we will provide a detailed review and step-by-step tutorial on how to turn off the update in Windows 10.
Turning off the automatic update of Windows 10 with Settings
How to turn off updates in Windows 10 through the settings option is as follows:
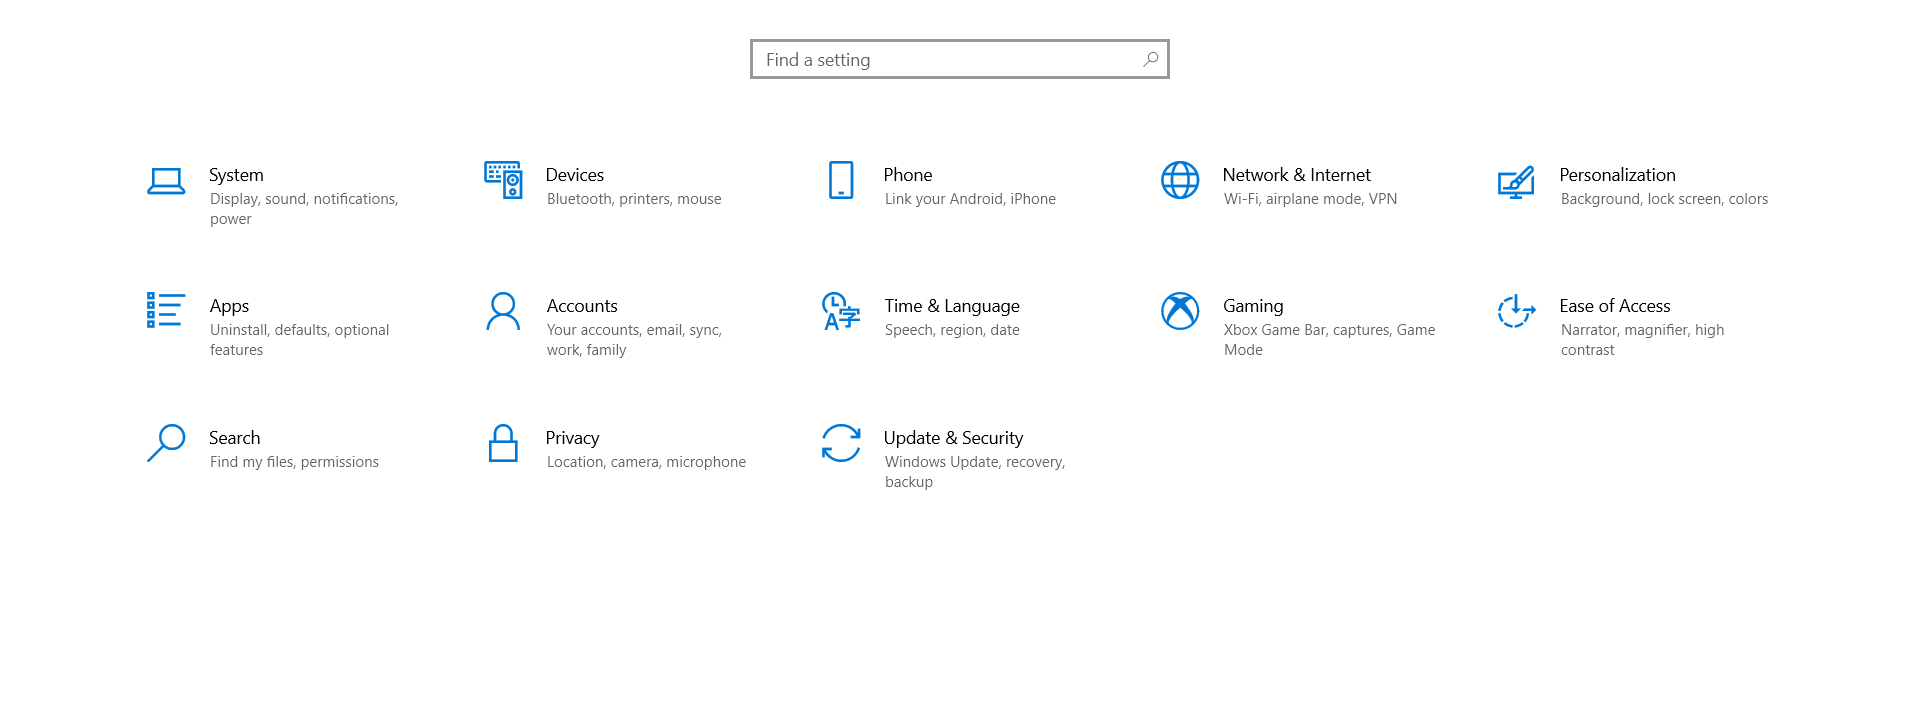
1. In this method, you must first open the Settings window. You can right-click on the start button and select Settings.
2. In the Windows Settings window, click Update & Security.
3. From the right side, click on the Windows Update option.
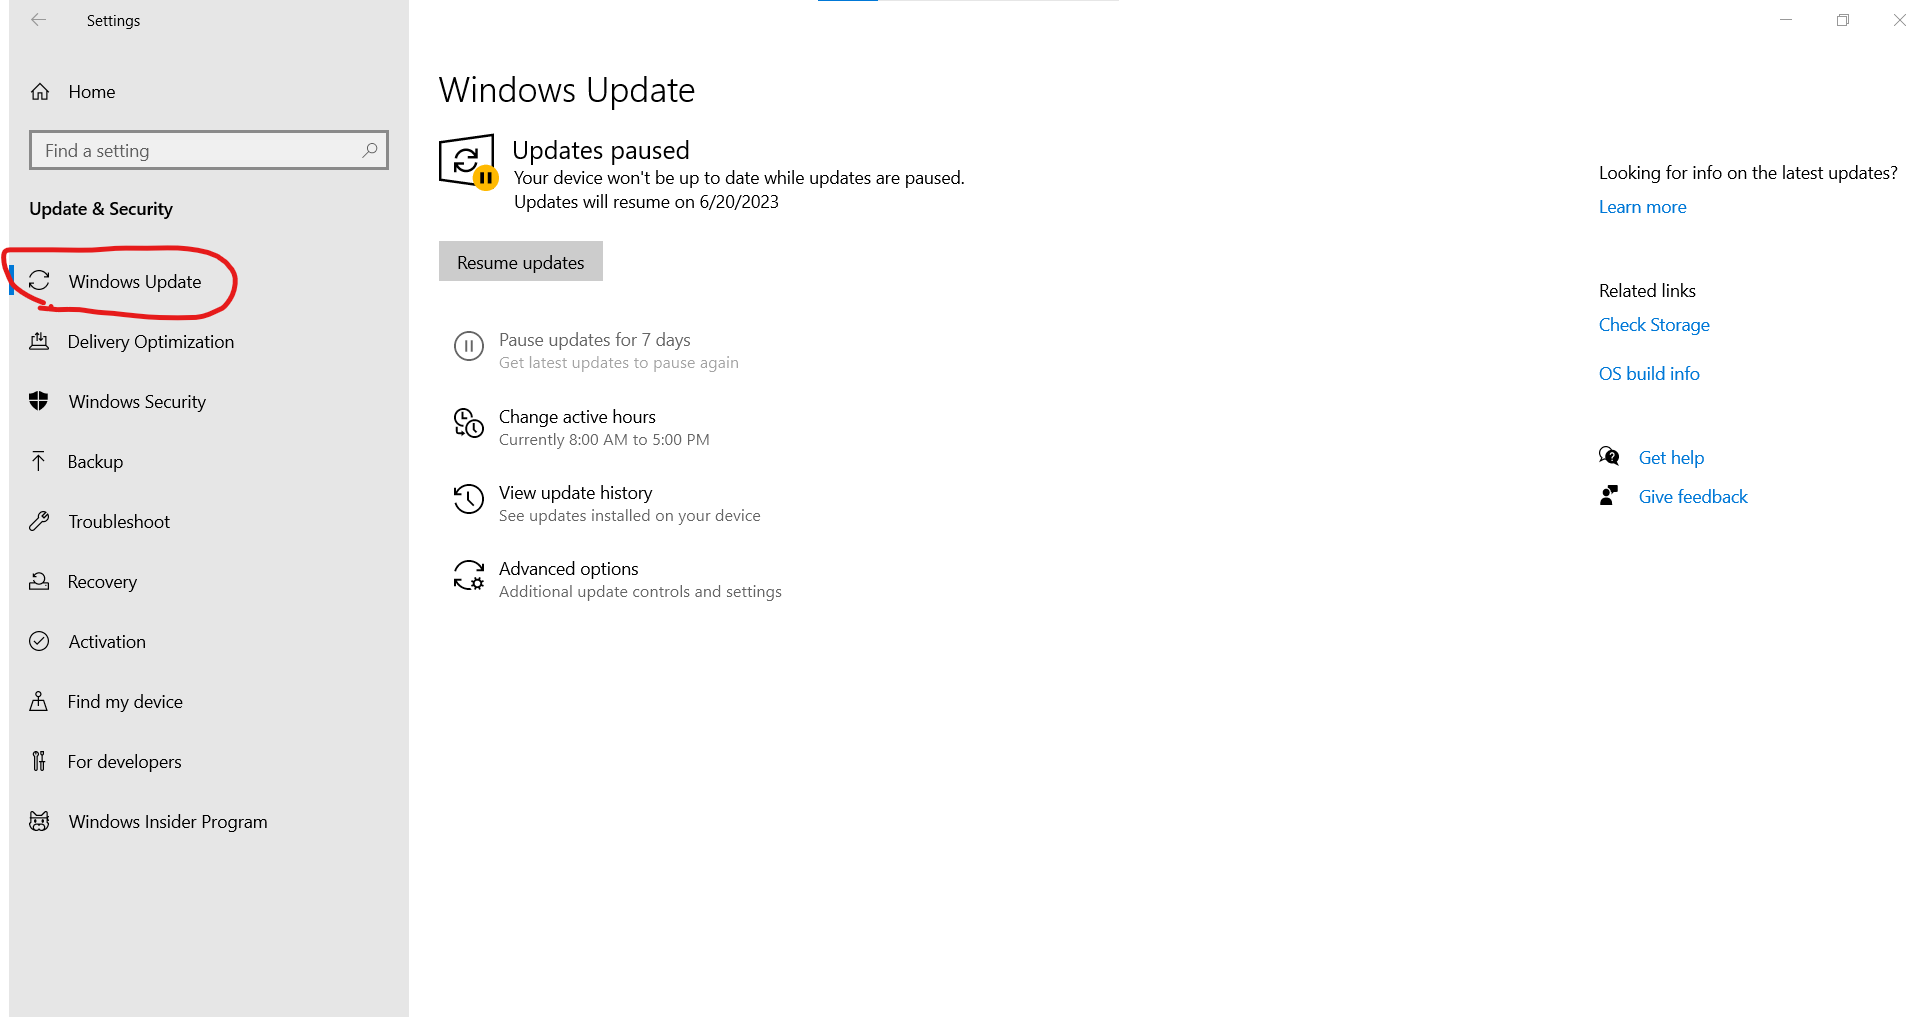
4. Click on Advanced options.
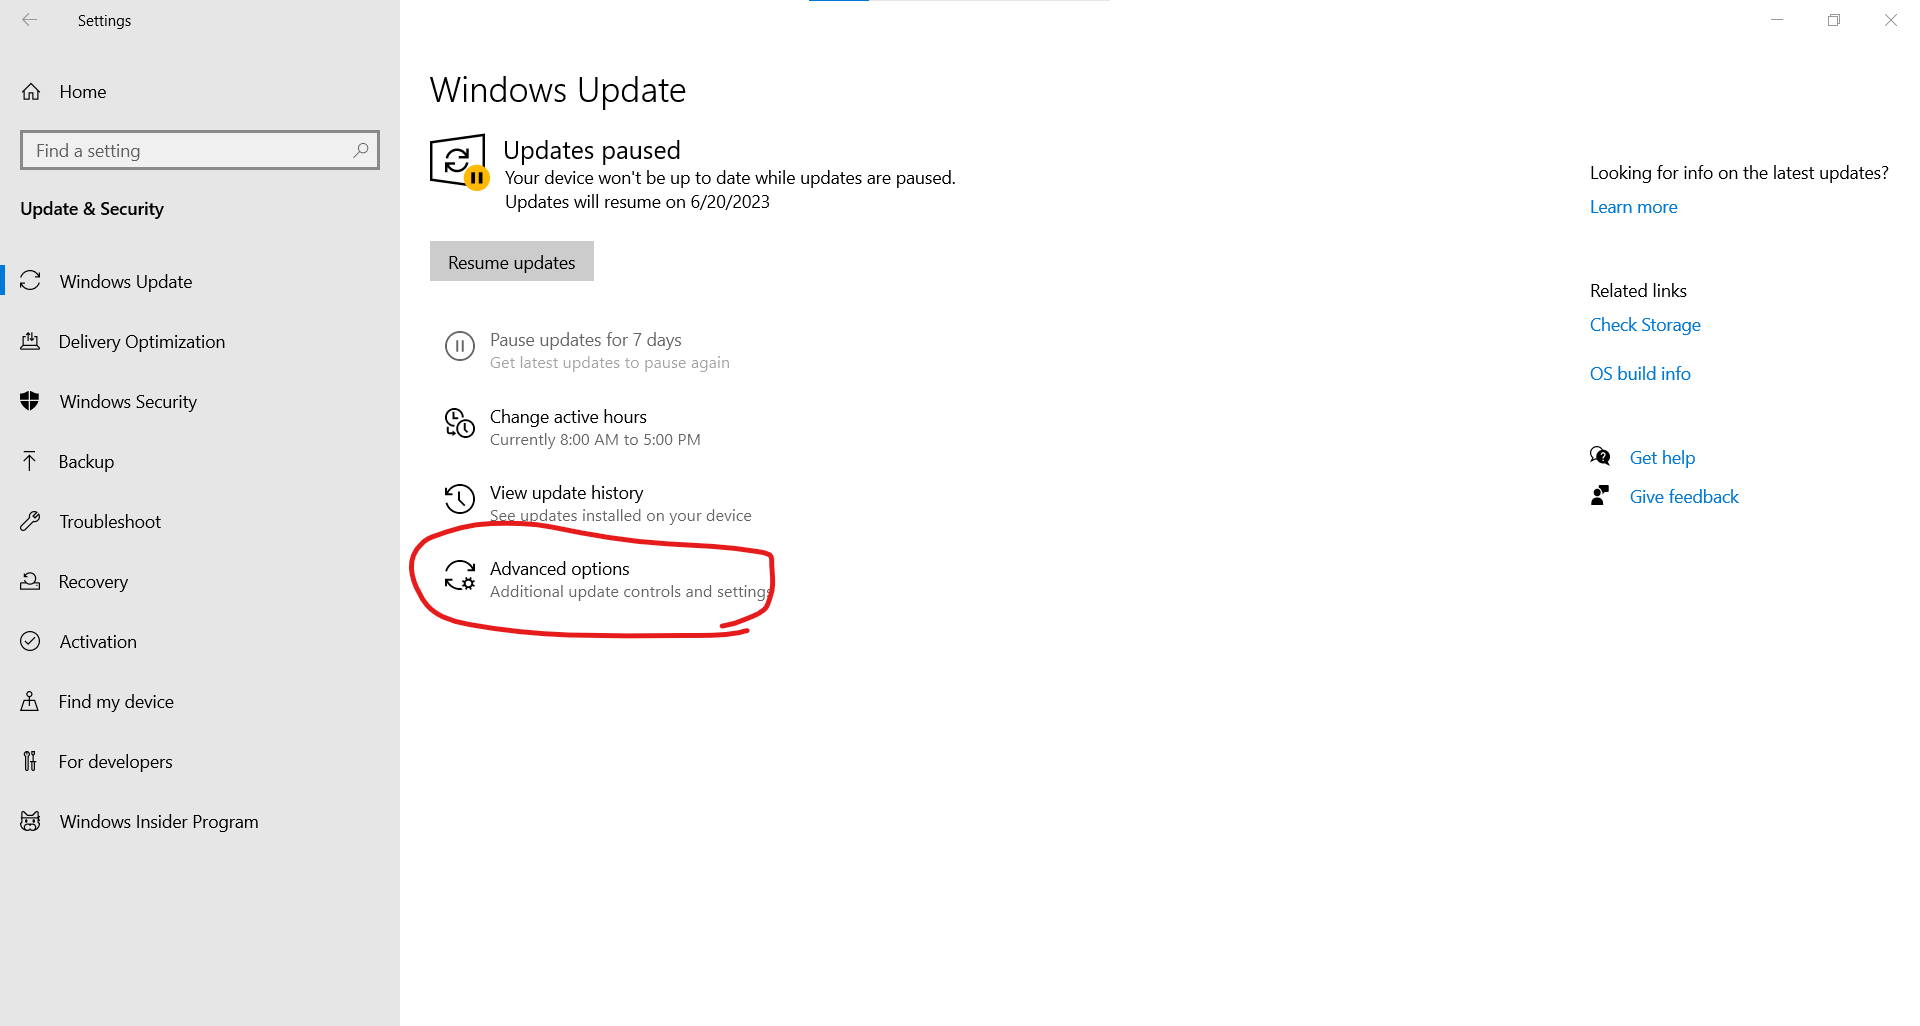
5. In the Advanced options window, open the drop-down menu in the Pause Updates section and select the date you want the Windows 10 automatic update to be activated again. Windows automatic update will be turned off until the date you specify. You can turn off the Windows 10 update for one month.
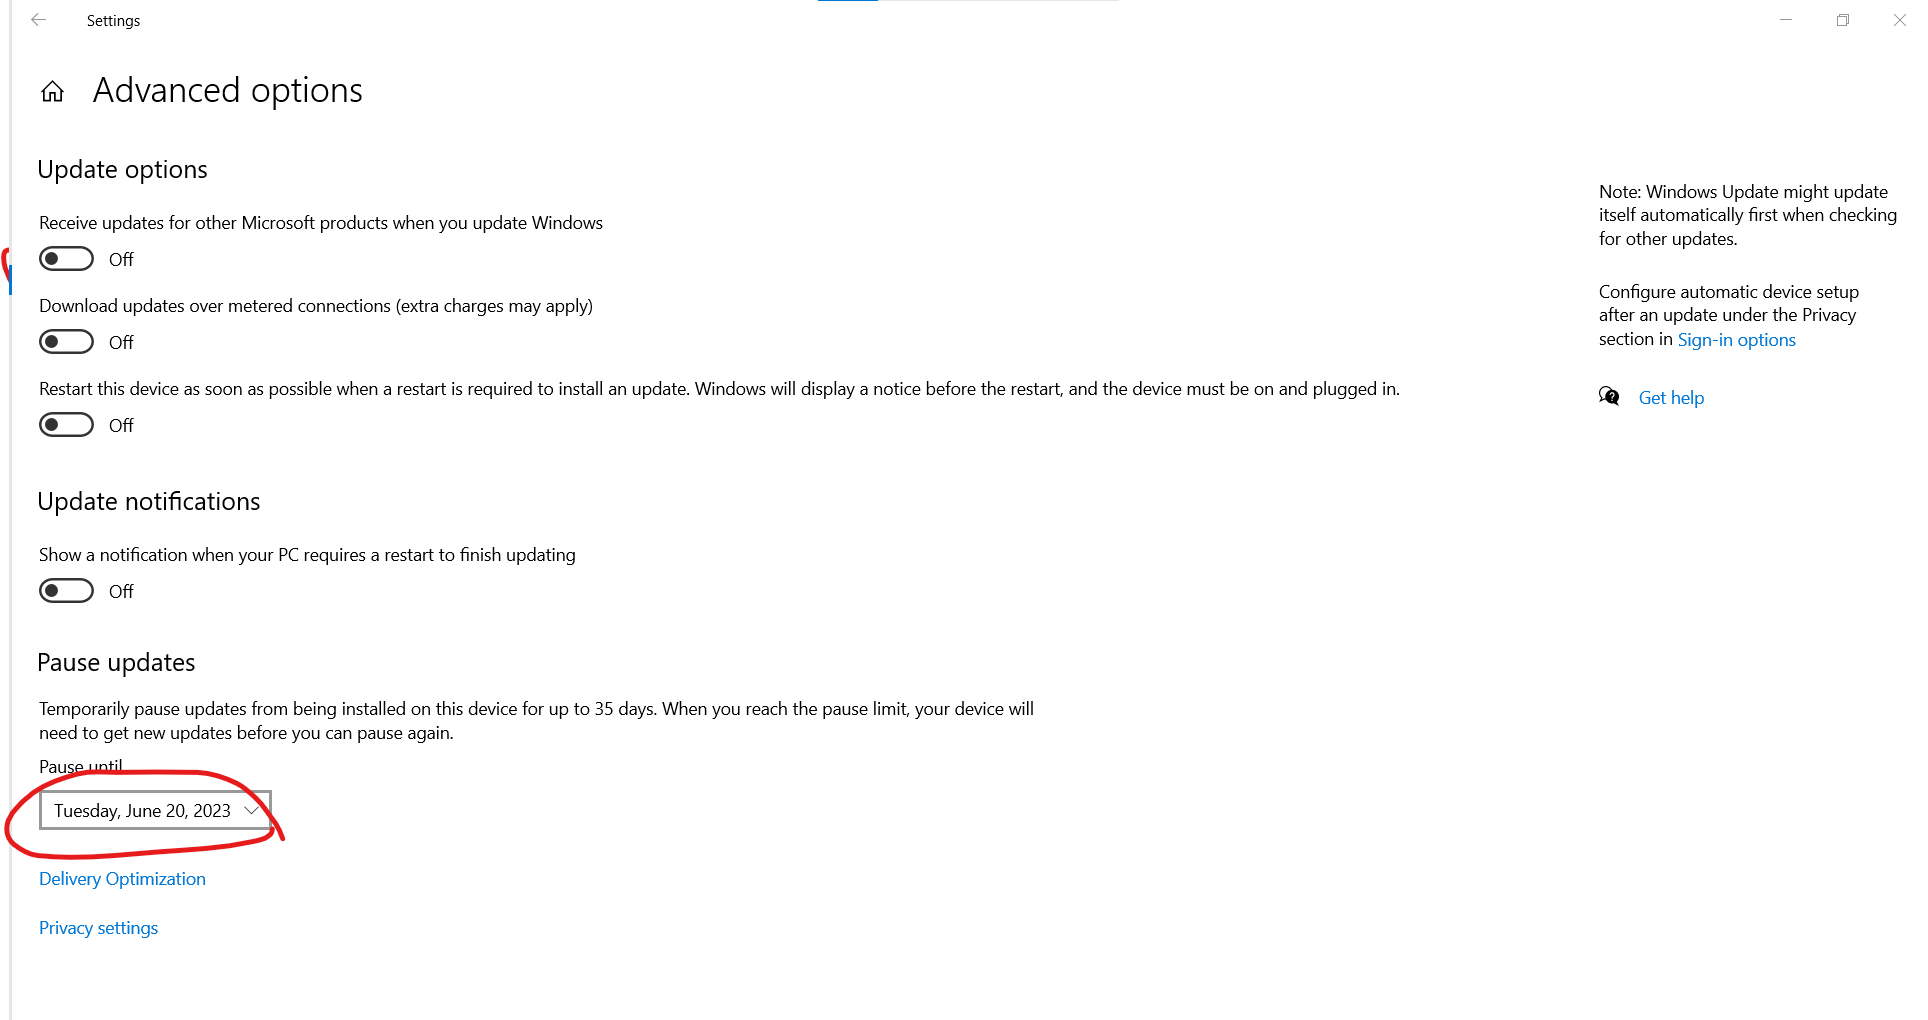
To activate the automatic update of Windows 10, just set the Pause Updates option to Select Date. Or click Resume Updates from the Windows Update window.
2. Disabling the automatic update of Windows 10 with the Windows Update service
Now let’s see how to disable automatic Windows updates using the Windows update service:
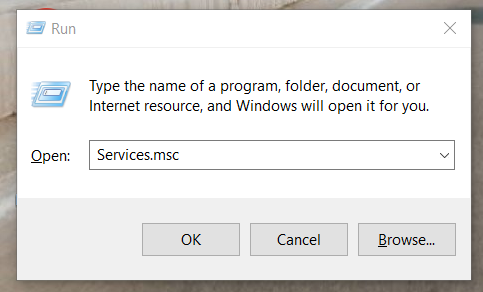
- First, open the Run section by pressing the Windows key + R.
- After the window opens, write the following command in this window and press Enter: Services. MSc
- In the next step, a page will open for you. Look for the Windows Update option in the list and double-click to open its window.
- In this window, select the Disable option from the Startup Type section.
- Then, at the bottom of the window, there is an option called Stop. Click on it to turn off Windows automatic update.
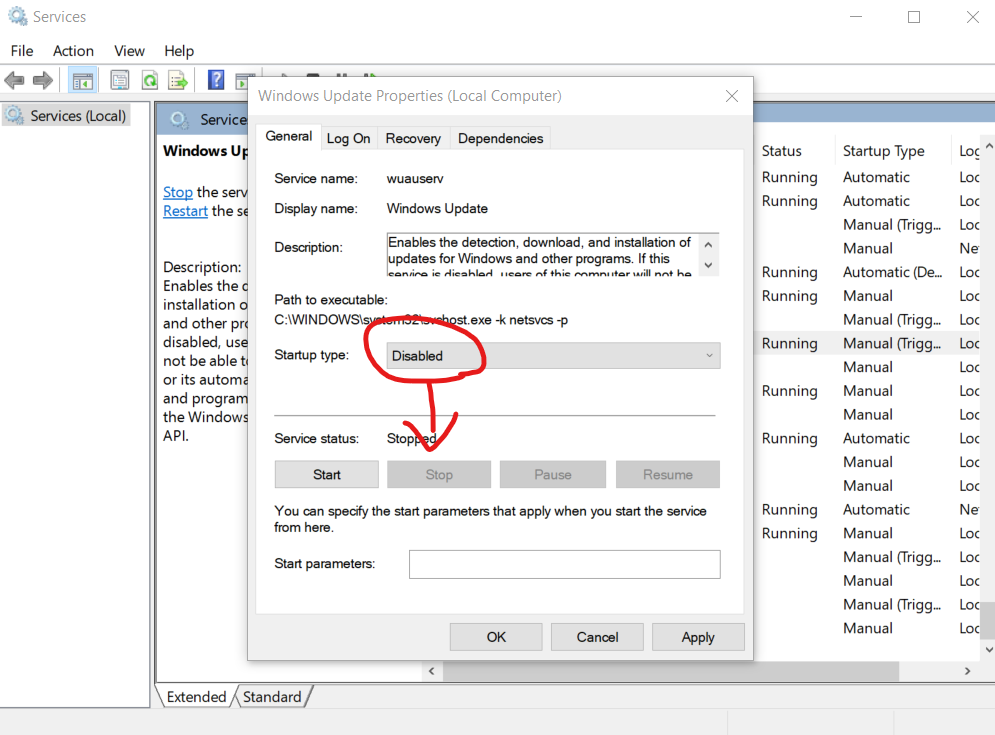
If you later decide to update Windows, you must do this simple way again and click on the Start button.
Disable Windows 10 automatic update with Group Policy
Now let’s see how to stop Windows 10 updates using Group Policy:
1. Open Start, and type gpedit. MSc, click the first title in the results to open the Group Policy Editor. Or open the Run section by pressing the Windows + R key and typing gpedit. MSC.
2. Then follow the following path:
- Computer Configuration > Administrative Templates > Windows Components > Windows Update
3. Double-click the Configure Automatic Updates option on the right side.
4. Click the Disabled option, then Apply and OK to turn off the Windows 10 automatic update policy.
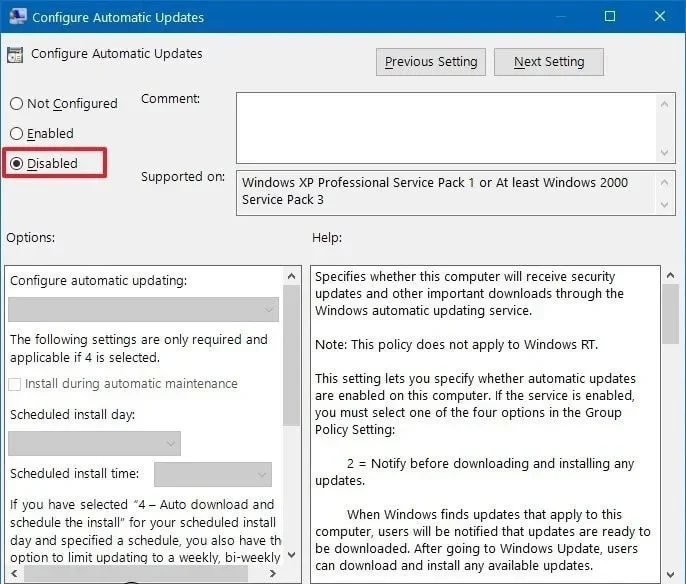
To activate the automatic update of Windows 10 through Group Policy, follow the same steps but select Not Configured in Step 4.
But there is a perfect solution so that we don’t wander between activating and deactivating the update in Windows 10 and being asked about how and when to do it, which is as follows:
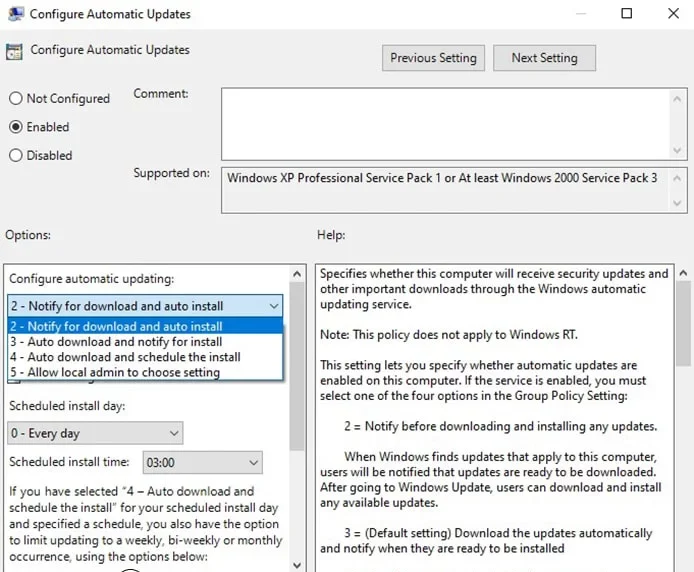
In step 4, select the Enable option. With this, the lower left part will be activated, where you can choose one of the five available options according to your situation and needs:
- 2- Notify for download and auto-install: Ask me to download and install.
- 3- Auto download and notify for installation: Download the update automatically, but ask me to install it.
- 4- Auto download and schedule the installation: Download the update automatically and schedule its installation.
- 5- Allow local admin to choose a setting: The admin should make the settings.
- 7- Auto Download, Notify to Install, Notify to Restart: Automatically download the update, ask me to install it, and restart the system.
The recommended option is option 2, which does not download automatically. You can turn on the Install Now option to download by selecting this option in Windows update settings.
Finally, click Apply and OK.
4. Disabling the automatic update of Windows 10 with the registrRegistrysee how to turn off Windows automatic update using the registrRegistryen Start, type regedit, and hit the first title of the results to open the Registry Editor. Or by pressing the Windows key + R, open the Run section and type regedit.
2. Then follow the following path:
- HKEY_LOCAL_MACHINE\SOFTWARE\Policies\Microsoft\Windows
3. Right-click on the Windows folder, select New, then select Key.

4. Name the new key WindowsUpdate and enter.
5. Right-click on the WindowsUpdate folder you created and select New and then Key
6. Name the new Key AU and enter.
7. On the right side of the window, right-click, select New, and then select DWORD (32-bit) Value.
8. Name the new key NoAutoUpdate and enter.
9. Double-click NoAutoUpdate and change its value from 0 to 1. This value can be 2, 3, 4, 5, or 7. The differences between these four items are:
- 2- Notify for download and auto-install: notification before downloading and installing the update
- 3- Auto download and notify for installation: automatic download of updates and notification before installation
- 4- Auto download and schedule the installation: automatic download of updates and notification before installation
- 5- Allow local admin to choose a setting: The admin should make the settings.
- 7- Auto Download, Notify to install, Notify to Restart: Automatic download and notification before installation and restart
Of course, the best option to permanently turn off the update in Windows is number 2. Still, you should choose one of these options according to your conditions.
10. OK.
11. Restart the computer.
To activate the automatic update of Windows 10 through the registry, follow the following steps, but in step 5, right-click on WindowsUpdate and select the Delete option.
5. Disabling the automatic update of Windows 10 with the software
Using Windows update management software is another method that we can use to turn off the automatic update of Windows 10. You can use software such as EaseUS Tools M, EaseUS CleanGenius, and Windows Update Blocker in this field.
In the following, we will teach you how to work with EaseUS CleanGenius software:
1. Download and run the program.
2. Go to the Optimization section.
3. The program automatically checks the status of the Windows update service.
If Windows Update is enabled, turn it off by pressing the button in the figure below.
To see if the Windows automatic update service is stopped or not, go to the following path:
1. Go to the start menu, type Services, and select Run as administrator.
2. Look in the list of services and find the Windows update option, click on it, and select the Properties option.
3. In the Service status section, you can see that the service has stopped.
6. Disabling the automatic update of Windows 10 with wifi settings
Use wifi to connect to the Internet. You can use the metered connection option settings to turn off the update in Windows 10. In this option, you can manage bandwidth. Note that if you are using wired Internet and not wireless, you cannot use this method to turn off the Windows 10 automatic update.
To do this, proceed as follows:
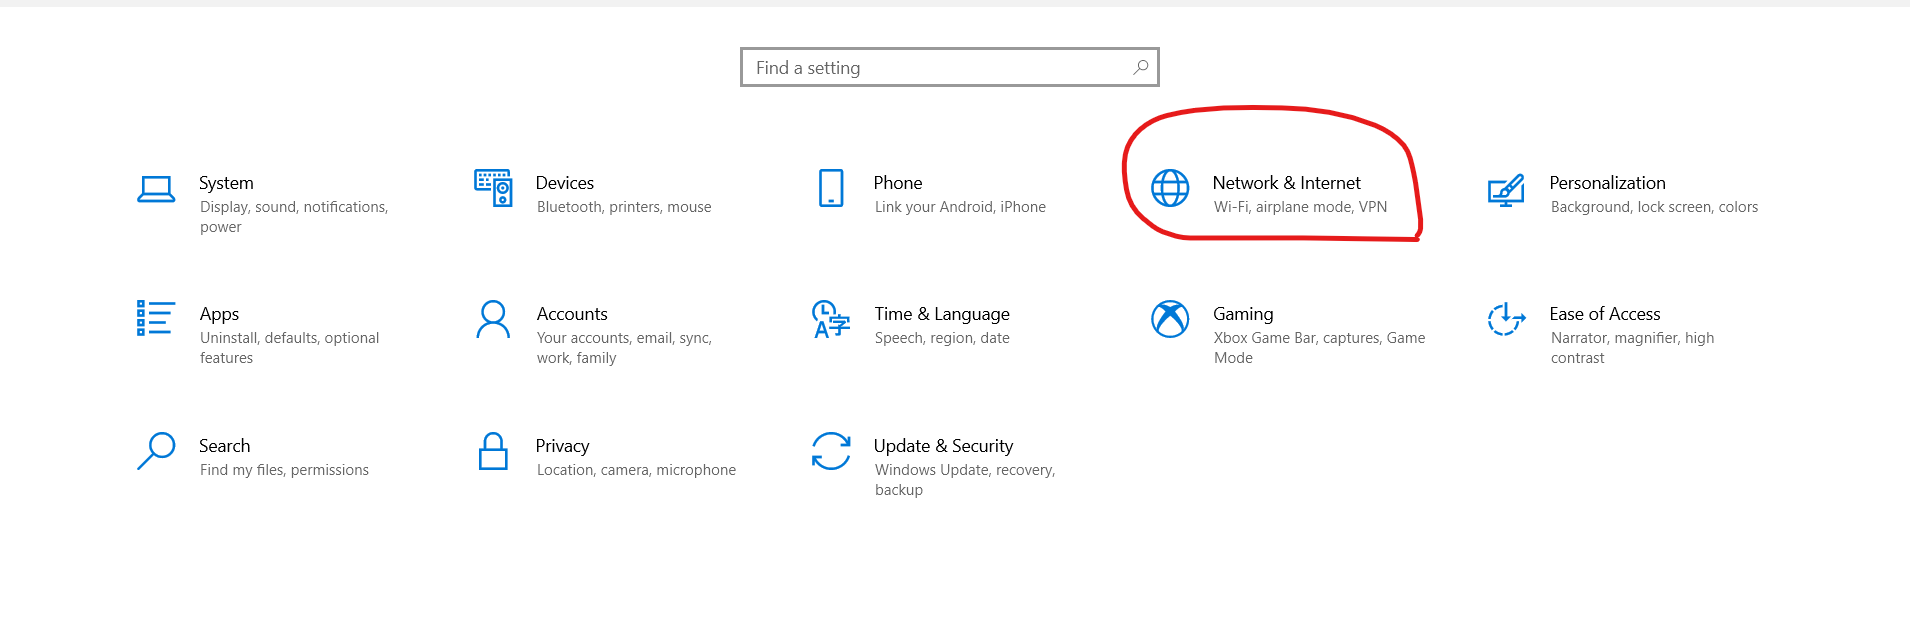
1. Press win + I simultaneously to open the Windows settings window. Then click on the Network & Internet option.
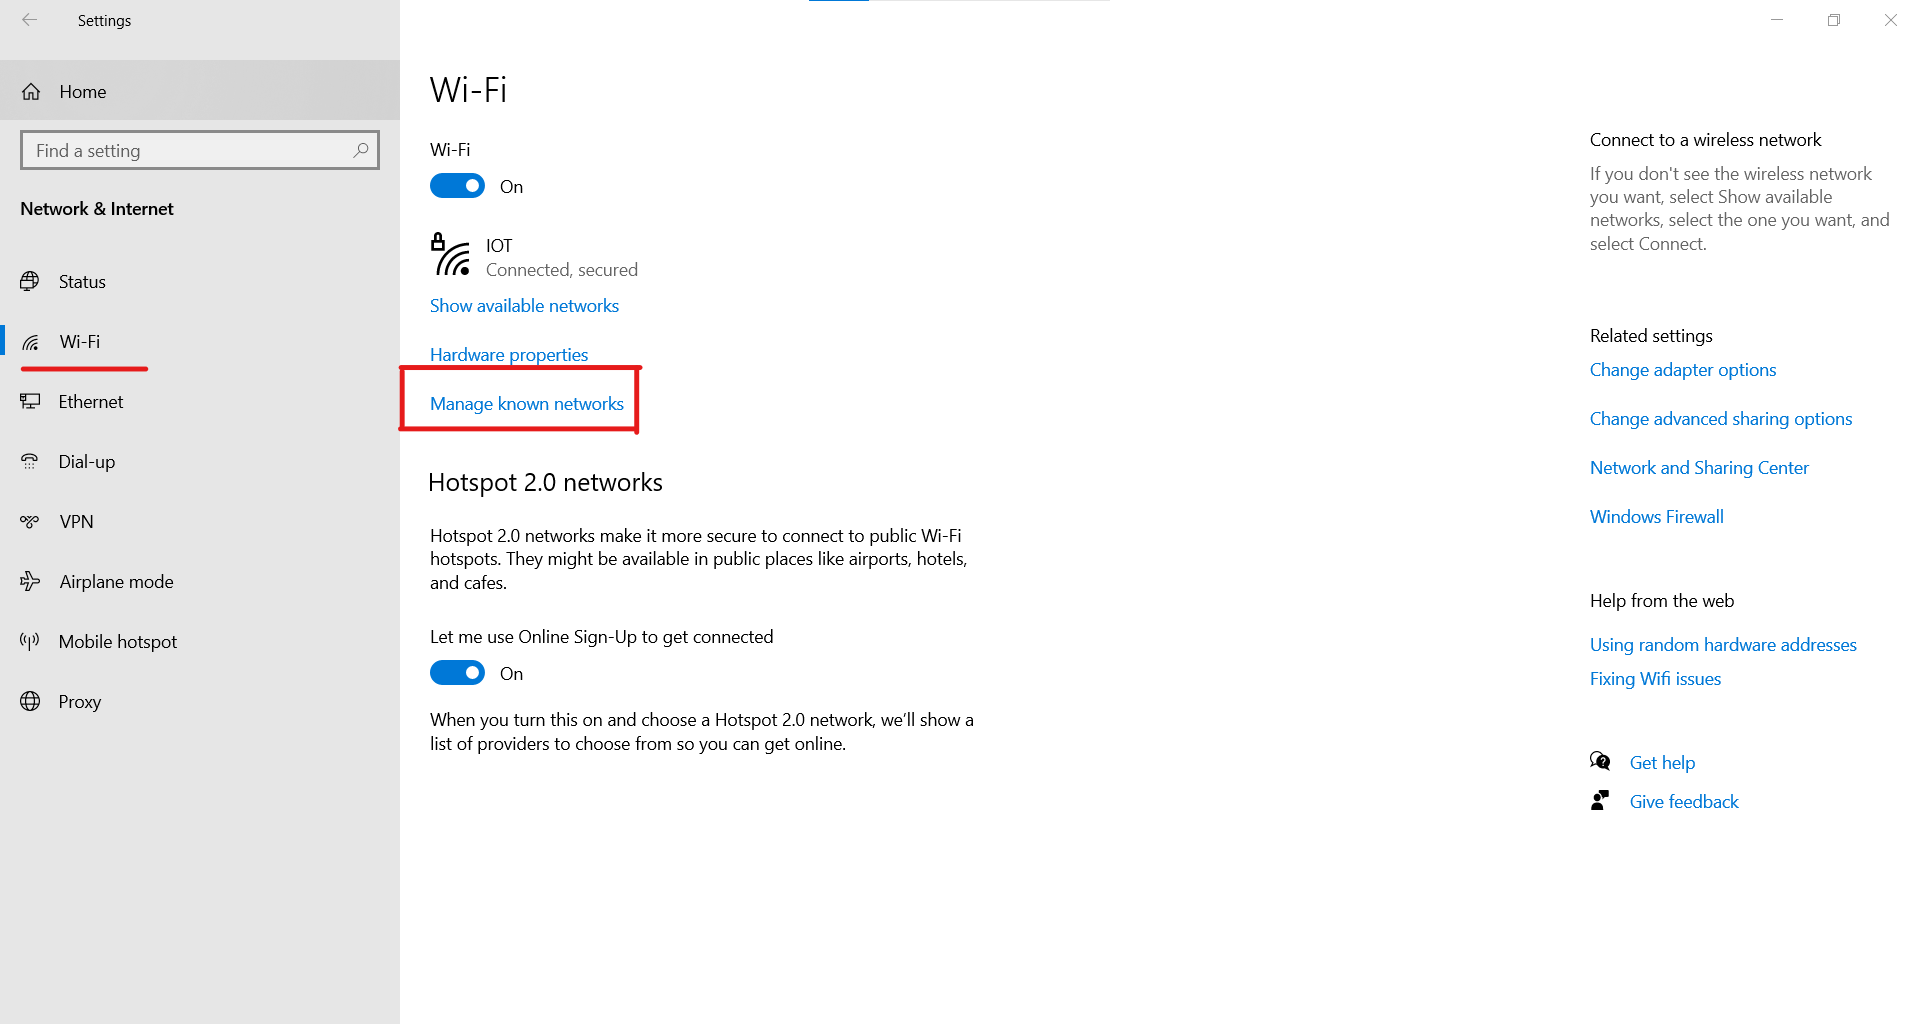
2. Open wifi and tap on Manage known networks.
3. Select Network, and then in the Properties section, set the Set as metered connection option to On.
